


I took on this enormous project as my 14th quilt (in 2004), just a few couple of years after I made my very first one. When you look at this quilt, you might not think it looks like an enormous undertaking, but considering this was the first time I tackled a quilt without having a step-by-step pattern to follow.
[wp_ad_camp_1]
I don’t remember how I came up with the idea of making this quilt, I just knew I wanted to make my daughter, Katie, something special for her high school graduation. I have seen t-shirt quilts and I had also seen quilts that incorporated photos, so I guess I decided to make a quilt using these items, but I didn’t stop there. I added many other personal items.
Some of the items I incorporated into this graduation memory quilt:
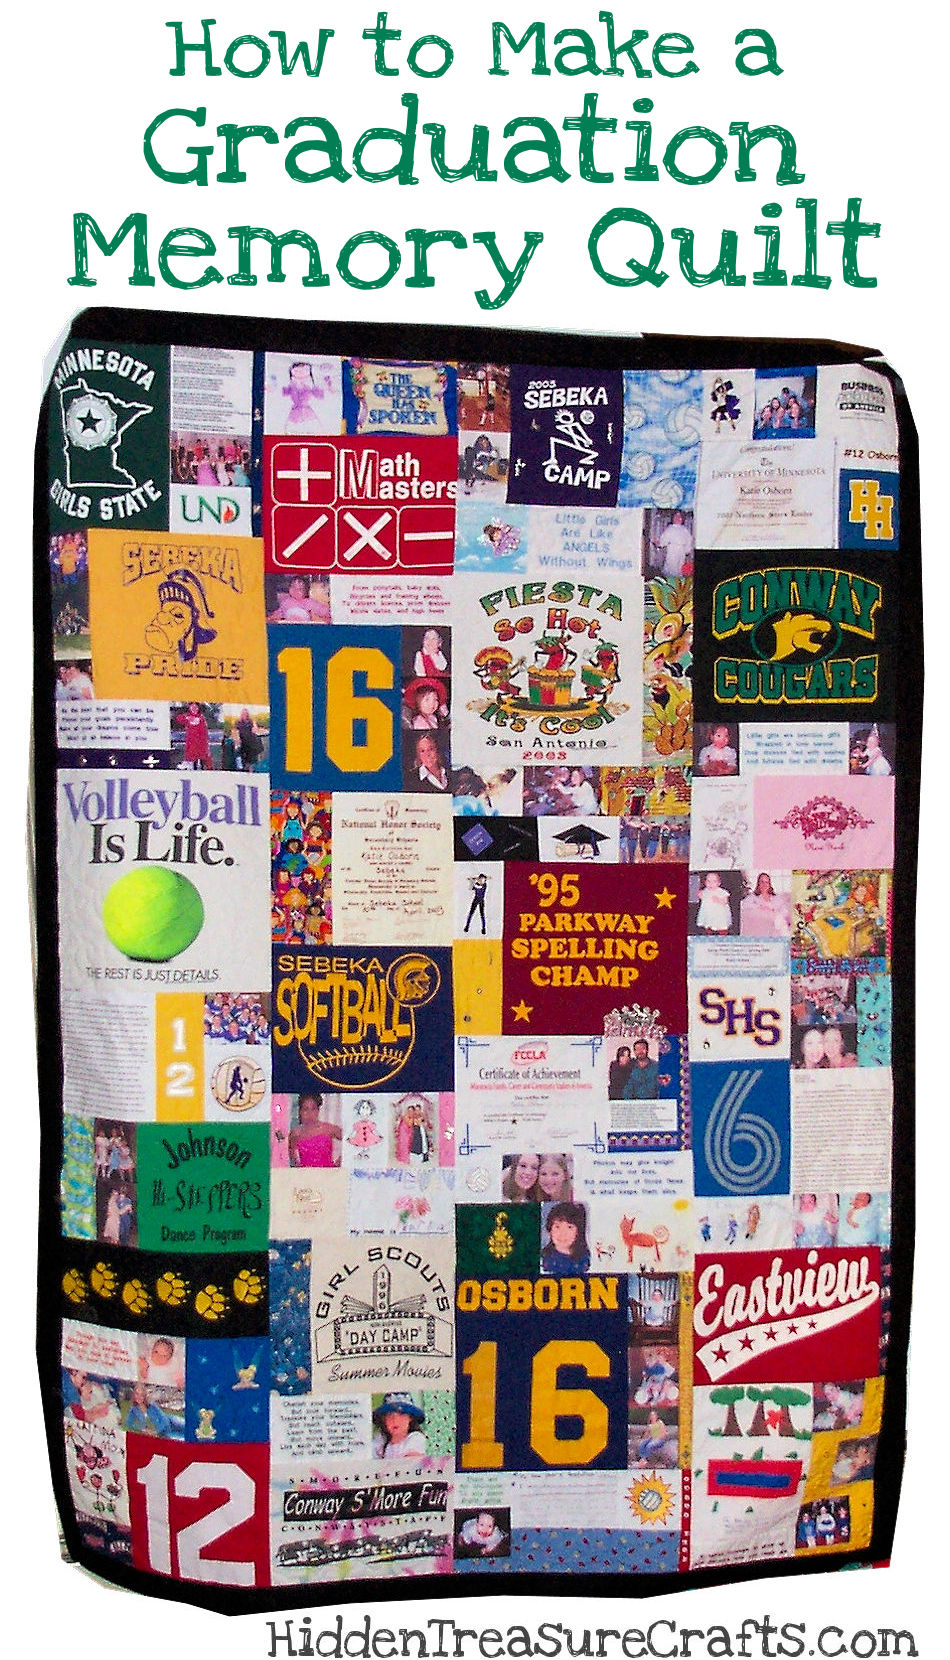
- Shirts – When I decided to make this quilt, I was so glad I had saved t-shirts, sweatshirts, and even jerseys dating at far back as I can remember. These included t-shirts from dance classes she attended as a very young girl, a t-shirt she got on a trip to San Antanio during high school, and everything in between. When you are working with any piece of clothing that might be sentimental, think beyond the main design that might be on the front (or back) of the shirt. If you look closely at the picture here, you will see a black strip of fabric near the bottom left hand side that has yellow paw prints on it… Those paw prints were printed on the sleeve of one of her volleyball team uniforms. One warning about using t-shirts and sweatshirts — While I am sure she appreciate the shirt being included in the quilt now, there was one t-shirt her and her best friend had bought a matching pair of (the light pink shirt with the darker pink writing/design on the right hand side of the quilt) that she was a little upset I “borrowed” it out of her drawer and cut it up. My warning to you is that you should be prepared to get a little flack if you decide to “borrow” shirts without the child’s knowledge or consent.The best way to get stretchy t-shirts and sweatshirts to cooperate when it comes to cutting them into squares and sewing them, is to back them with a lightweight fusible interfacing
(affiliate link). This will prevent the knit fabric that those shirts are usually made out of from stetching. Start out by cutting the disgns into the biggest square possible, that way you can hopefully trim them to the correct size when you are sewing pieces together.
- Photos – I loved going through photos for this quilt. The hardest thing was trying to decide which ones to use and I am sure I ended up with plenty leftover once the quilt top was put together. I tried to pick a variety for all ages and stges of her life. I scanned each picture and then printed them out on printer fabric sheets. One thing I learned was that not all printer fabric is created equal. One (less expensive) brand I bought were thicker than others and felt stiff and almost rough, another was thin and almost silky (more expensive). tHE BRAND i USUALLY PREFER IS EQ Printables Inkjet Cotton Lawn Fabric Sheets
(affiliate link).when it comes to printing photos onto fabric, make sure the fabric sheets you buy are colorfast. Also make sure you follow the directions on the package exactly! When it comes to prepping the photos for printing, I did discover the pictures looked better on the fabric is I used my graphic program to lighten them just a little bit.
- Certificates, Art, School, Work, Etc. – If you are anything like me, you have a box of momentos you have saves over the year. Amongst these, I found some certificates my daughter had earned through the years. some pictures drawn as part of school projects, annd even some written reports and other school work. I also found some newspaper articles she was mentioned in.As with the photos, I scanned these items and printed them out on colorfast printer fabric sheets. Once printed, make sure you follow the directions on the printer fabric sheet package to make sure they stay colorfast.
- Embroidered Quilt Blocks – I made this quilt shortly after I got my homr embroidery/sewing machine so I used the quilt as an excuse to play with it a little bit. I cut a bunch of squares out of white cotton fabric and embroidered them to use in her quilt. These embroidered designs included inspirational quotes and designs that were related to her school days.
- Random Fabric Scraps – Because I knew the blocks for this quilt would be a bunch of different sizes, I picked out a bunch of fabric scraps to use to fill in the gaps. I tried to pick fabric my I thought daughter would relate to.
- BUttons, Charms, and Patches – ALthough most are hard to pick out in this picture, I did hand sew on quite a few bittons and charms. You can easily find the patches I sewed on… See the vertical number 12 just below the Volleyball Is Life t-shirt? Those were patches and the number of her volleyball uniform.
While gathering together all of these items was time consuming, it was also very fun. I enjoyed going through everything and reminescing. The real work for this quilt came with trying to figure out how to put it all together. At first, I tried laying everything out to form the entire quilt top. This proved to be beyond frustrating so I decided to break it down into smaller pieces.
Usually, when you work on a quilt, you create all of the blocks, put them together in rows, and then sew all of the rows together. For this quilt I worked more in vertical rows, piece by piece. I started off with the largest block I had and worked from there. Again, I will refer you to the Volleyball Is Life t-shirt square — this was the first block I worked with. I pieces together other items to make blocks that were the same width as that one block. I them sewed them together to form the first vveritcal row. If you look closely you can make out the first row and even make out the others.
For the most part, it was easier to do than it sounds. This is because when I needed to make a block a little bigger to fit into the row, I added a piece of the scrap fabric. If something needed to be a little smaller, I would trim it down if possible. I did make a lot more memory blocks than I needed though, so I had plenty of blocks to choose from and most were a variety of different sizes.
This quilt top enbded up to be a little bigger than a traditional twin bed size. When it came to the actual quilting, I meandered the best I could, sticking to mainly sewing over the seams. Once the quilting and binding was done, I sewed on the charms, buttons, etc.
My daughter was really surprised when I presented this to her the night of graduation. Partially because of the borrowed t-shirts she saw in it that she had been searching for, but mostly because she loved it. She even found a use for it at college — besides using it on a bed, she used it as a prop for a speech she had to give about her life!
Disclosure: As noted above, this post contains affiliate links. See my disclosure policy for details.
Cost to make a tshirt quilt. How many do I need. How long other takes etc…
Are you wondering how much it would cost for yu to make one?